Saturday 27 December 2008

Manually Uninstalling SLS

Normally in cluster, we need to manually uninstall the SQL LiteSpeed.

Here the steps for uninstalling the SLS manually:

Delete the following XPs from within master
xp_file_search
xp_sqllitespeed_version
xp_sqllitespeed_licenseinfo

Use the following query for removing the XPs:

if exists (select * from dbo.sysobjects where id =object_id(N'[dbo].[xp_sqllitespeed_licenseinfo]') and OBJECTPROPERTY(id,N'IsExtendedProc') = 1)exec sp_dropextendedproc N'[dbo].[xp_sqllitespeed_licenseinfo]'
if exists (select * from dbo.sysobjects where id =object_id(N'[dbo].[xp_sqllitespeed_version]') and OBJECTPROPERTY(id,N'IsExtendedProc') = 1)exec sp_dropextendedproc N'[dbo].[xp_sqllitespeed_version]'

if exists (select * from dbo.sysobjects where id =object_id(N'[dbo].[ xp_file_search]') and OBJECTPROPERTY(id,N'IsExtendedProc') = 1)exec sp_dropextendedproc N'[dbo].[xp_file_search]'

Remove the following registry entries:
HKLM\SOFTWARE\Imceda
HKCU\Software\Imceda
HKCR\CLSID\{FAB7BBA2…}

Delete the following DLLs from SQL Binn folder:

xpSLS.dll
xpSLSImportStats.dll
xpLogShipping.dll

Delete all parent/child Imceda directories.

Binary files are removed from the directories ($\Imceda\LiteSpeed\SQL Server\Engine\Logs). Any of those parent\child directories should be deleted from all nodes in the cluster.

Tips during the installation of SLS on SQL Cluster:

When installing, installation should be performed from the Active node in the cluster to a drive that is unshared, but common to all nodes. E.g., D: drive (physical not virtual). Also be sure that “Remote Registry” service (svchost.exe) is running to help propagate bits to the passive node\nodes. SLS is cluster aware and should get installed on both nodes.


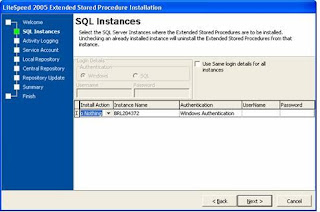
During phase 2 of installation (Instance Configuration: XP Installation), please be sure to choose ‘Do Nothing’ under Install Action for each instance that is active, and is not on the node(Virtual server) currently undergoing installation. Please find the screen shot below:

Here are the Xps associated with corresponding DLLs in SQL LiteSpeed:

Ø xpSLS.dll
xp_backup_database
xp_backup_log
xp_delete_tsmfile
xp_file_search
xp_memory_size
xp_objectrecovery
xp_objectrecovery_viewcontents
xp_rebind_tsmmc
xp_restore_checkpassword
xp_restore_database
xp_restore_filelistonly
xp_restore_headeronly
xp_restore_log
xp_restore_setinfo
xp_restore_verifyonly
xp_sls_bcp
xp_slsAddRegMultiString
xp_slsReadProgress
xp_slsRemoveRegMultiString
xp_sqllitespeed_debug
xp_sqllitespeed_licenseinfo
xp_sqllitespeed_version
xp_view_tsmcontents
xp_view_tsmfilespaces
xp_view_tsmmc


Ø xpLogShipping.dll'
xp_slssqlmaint'

Ø xpSLSImportStats.dll

xp_litespeed_importstats
xp_litespeed_readlogs

MSDB database has been corrupted in SQL2000

We now proceed further with following steps:
1. Restart the SQL server using trace flag 3608 then detach msdb databse. (-T3608)2. Navigating to the directory 'C:\Program Files\Microsoft SQL Server\MSSQL.1\MSSQL\Binn' and doing the following: start sqlservr.exe -c -T3608
3. Move or rename the damaged msdb files (msdbdata.mdf and msdblog.ldf in the 'C:\Program Files\Microsoft SQL Server\MSSQL.1\MSSQL\Data' directory)
4. Run the instmsdb.sql script in the 'C:\Program Files\Microsoft SQL Server\MSSQL.1\MSSQL\Install' directory
Shutdown and restart the server without the 3608 trace flag

How to Change collation Change in SQL server 2005 (For Stand Alone/Cluster Server)

How to Change collation Change in SQL server 2005 (For Stand Alone Server)

http://msdn.microsoft.com/en-us/library/ms144259.aspx

start /wait \setup.exe /qn INSTANCENAME=MSSQLSERVER REINSTALL=SQL_Engine REBUILDDATABASE=1 SAPWD= SQLCOLLATION=

Note: SAPWD is not required if SQL is having Windows Authentication.


Point to be considered before collation change for cluster servers. SQL Server 2005 (Cluster Environment)
1. Virtual server name needs to be offline
2. http://support.microsoft.com/kb/q298568/
3. SQL server Browser Services needs to be in stopped state.
Run the below query from the command prompt
start /wait setup.exe /qn VS=cubsnew REINSTALL=SQL_Engine REBUILDDATABASE=1 GROUP=SQL Group NODELIST="tk5siebelpp0a,tk5siebelpp0b" SKUUPGRADE=1 SQLCOLLATION=Latin1_General_CI_AI
VS= SQL Server Virtual NameGROUP= SQL Group
NODELIST=”All Node Name”SKUUPGRADE=1SQLCOLLATION=New Collation Name


For SQL 2008:

Setup /QUIET /ACTION=REBUILDDATABASE /INSTANCENAME= MSSQLSERVER /SQLSYSADMINACCOUNTS= BUILTIN\Administrators /[ SAPWD= StrongPassword ] [ /SQLCOLLATION=CollationName]

http://msdn.microsoft.com/en-us/library/dd207003.aspx

MSDTC/ Client component issue after SP2 installation SQL2005

Error Displayed in Summary.txt after installation:
MSP Error: 29549 Failed to install and configure assemblies D:\MSSQL_Tools (x86)\90\NotificationServices\9.0.242\Bin\microsoft.sqlserver.notificationservices.dll

MSDTC Event ID: 4384
http://forums.microsoft.com/TechNet/ShowPost.aspx?PostID=2036880&SiteID=17

Checked cluster admin, and sure enough it is not there. You need to register MSDTC as a cluster resource, and then restart setup.

This is known issue, where client tool upgrades will not work unless the Distributed Transaction Coordinator is registered in the MSCS cluster (even if the SQL Engine is not installed)


How to configure Microsoft Distributed Transaction Coordinator on a Windows Server 2003 cluster
http://support.microsoft.com/kb/301600/

How to enable network DTC access in Windows Server 2003
http://support.microsoft.com/kb/817064/

Not able to Start SQL Service due to diff path of TempDB database.

Issue: SQL services are stopped. Not able to Start due to diff path of TempDB database.
Assessment/Actions taken:
1. When we try to start we are ending up with the below error messages:
udopen: Operating system error 3(The system cannot find the path specified.) during the creation/opening of physical device D:\MSSQL\data\msdbdata.mdf.
FCB::Open failed: Could not open device d:\Program Files\Microsoft SQL Server\MSSQL\data\model.mdf for virtual device number (VDN) 1.
udopen: Operating system error 3(The system cannot find the path specified.) during the creation/opening of physical device D:\MSSQL\data\msdbdata.mdf.

2. These error messages says that few.MDF and .LDF files are missing. When we check, we could see all these files are available on driver C: (Path C:\Program Files\Microsoft SQL Server\MSSQL).

3. So we have copied all these databases from Drive C$ to Drive D$ (to where the MSSQL server is pointing)

4. After this step, we have started the service and experienced an error with the Tempdb database, SQl server service is pointing this database to T:\MSSQL\DATA\tempdb.mdf. But we are unable to find the Drive T$ (There is no Drive T$ on the server).


Log Name: Application
Source: MSSQLSERVER
Date: 27-12-2008 21:27:35
Event ID: 17204
Task Category: Server
Level: Error
Keywords: Classic
User: N/A
Computer: Pawan-PC
Description:
FCB::Open failed: Could not open file C:\MSSQL\TempDB\DATA\tempdb.mdf for file number 1. OS error: 3(failed to retrieve text for this error. Reason: 15105).


This is where the actual problem started, TempDB path is incorrect and we are unable to find the drive. Please follow these steps to resolve this issue:
a. Start SQL Server from a DOS session with minimal config and trace flag to bypass system db recovery (other than master):

Point CMD to Binn Folder C:\MSSQL\MSSQL10.MSSQLSERVER\MSSQL\Binn

NET START MSSQLSERVER /f /T3608

(We are unable to start with the SqlServr -c –f)

If your SQL instance is not the default instance, replace MSSQLSERVER with MSSQL$ where is the instance name.

When the SQL Server is started, you'll see the following:
The SQL Server () service is starting.The SQL Server () service was started successfully.

Then bring up the SQL Server error log and look for the following:
4:20:18.92 Server Dedicated admin connection support was established for listening locally on port 2168.


C:\MSSQL\MSSQL10.MSSQLSERVER\MSSQL\Binn>NET START MSSQLSERVER /f /T3608
The SQL Server (MSSQLSERVER) service is starting.
The SQL Server (MSSQLSERVER) service was started successfully.

b. Connect locally from the DOS prompt using the dedicated admin connection (DAC):
i. For SQL server 2005 use the command:
sqlcmd OR SQLCMD –A (For more info check SQL BOL)
sqlcmd -S tcp:127.0.0.1,
ii. For SQL server 2000 use the command:
Isqlw
iii. If i and ii is not working then Used OSQL utility to connect SQL Server
OSQL –SMSSQL$InstanceName –E

If Default Instance
OSQL –E (For more info check SQL BOL)

c. This will bring you the Query analyzer in SQL Server 2000; in 2005/2008 the prompt will get changed to 1>, then run the alter commands to modify the location of tempdb:

C:\MSSQL\MSSQL10.MSSQLSERVER\MSSQL\Binn>OSQL -E

1> ALTER DATABASE TEMPDB
2> MODIFY FILE
3> (NAME=templog,
4> FILENAME='C:\MSSQL\MSSQL10.MSSQLSERVER\MSSQL\DATA\templog.ldf'
5> )
6> go
The file "templog" has been modified in the system catalog. The new path will
be used the next time the database is started.

1> ALTER DATABASE TEMPDB
2> MODIFY FILE
3> (NAME=tempdev,
4> FILENAME='C:\MSSQL\MSSQL10.MSSQLSERVER\MSSQL\DATA\tempdb.mdf'
5> )
6>
7> go
The file "tempdev" has been modified in the system catalog. The new path will
be used the next time the database is started.
1> exit

C:\MSSQL\MSSQL10.MSSQLSERVER\MSSQL\Binn>NET STOP MSSQLSERVER
The SQL Server (MSSQLSERVER) service is stopping.
The SQL Server (MSSQLSERVER) service was stopped successfully.

Change the paths etc as appropriate if your locations are different.

Monday 13 October 2008

How to check Service Broker is Enabled or Disabled in SQL2005

Service Broker - Service Broker will be disabled when a backup is restored
You may be surprised to see your service broker application does not work after you restore a backup. The reason is that, when you restore a backup, the new Database will be restored with service broker in disabled mode. You can run the following query to check this.

SELECT is_broker_enabled FROM sys.databases WHERE database_id = DB_ID()

Run the above query in the newly restored database and it will return 0. The reason for this behavior is the following.

Each database contains a service broker identifier that uniquely identifies the service broker instance within the network. This unique identifier is used to identify the correct instance of the service broker and deliver messages. When you restore a database, the newly restored database will have the same service broker instance ID as the database from which the backup is taken. This can cause conflicts and existing service broker applications can be disturbed. To avoid this, when a database is restored, service broker is disabled.

To enable service broker you should run the following.
ALTER DATABASE dbname SET NEW_BROKER

This will reinitialize sevice broker, will assign a new service broker instance ID and clear the messages in the queues. You can run the query we saw previously to make sure that service broker is enabled. If you check the service_broker_guid column of sys.databases, you could see that a new GUID is assigned to the service broker instance of the new database.
Ref: http://www.sqlserverandxml.com/2008/08/service-broker-service-broker-will-be.html

-- Enable Service Broker:
ALTER DATABASE [Database Name] SET ENABLE_BROKER;

-- Enable Service Broker with new service_broker_guid, used when you restored any database:
ALTER DATABASE dbname SET NEW_BROKER

-- Disable Service Broker:
ALTER DATABASE [Database Name] SET DISABLE_BROKER;
Node: By default service broker is enabled for TEMPDB & MSDB databases.
For More Information: http://msdn.microsoft.com/en-us/library/ms166057.aspx

Thursday 2 October 2008

Automated Monitoring Database Size Using sp_spaceused

Use this:
exec master.dbo.sp_msforeachdb "exec [?].dbo.sp_spaceused"

For more information please go to the below link:
http://www.sqlservercentral.com/articles/Administration/2771/

Determing SQL Server Table Size

Here is the Scripts: Using this you can findout the spaceused by the tables in a database.

Solution 1: Using this script you can only check the size of user tables not system tables.
DECLARE @SQL VARCHAR(255)
SET @SQL = 'DBCC UPDATEUSAGE (' + DB_NAME() + ')'
EXEC(@SQL)
CREATE TABLE #foo
(
name VARCHAR(255),
rows INT ,
reserved varchar(255),
data varchar(255),
index_size varchar(255),
unused varchar(255)
)
INSERT into #foo
EXEC sp_MSForEachtable 'sp_spaceused ''?'''
SELECT * FROM #foo
DROP TABLE #foo

Solution 2:
The SYSINDEXES file keeps tracks of all information.
The size are the number of pages, and each page is 8Kb, so they need to be converted.

USE sql911;
go

SELECT CAST(OBJECT_NAME(id) AS VARCHAR(12)) AS 'Table',
CAST(rowcnt AS VARCHAR(6)) AS '#Rows',
reserved * 8 AS 'Disk - Kb',
dpages * 8 AS 'Data - Kb',
(SUM(used) * 8) - (dpages * 8) AS 'Index - Kb'
FROM sysindexes
WHERE indid IN (0,1)
AND OBJECTPROPERTY(id, 'IsUserTable') = 1
GROUP BY id, rowcnt, reserved, dpages
ORDER BY 'Table';
go
Note:
You must first select the database.
SYSINDEXES store the space allocated in pages.
The standard page size is 8kb, unless you created the database with a different page size, then adjust the query.

------------
For more information please go to below link:
http://www.eggheadcafe.com/software/aspnet/30215209/database-table-size.aspx
http://www.sqlhacks.com/index.php/Administration/RecordsForAllTables
http://www.mitchelsellers.com/blogs/articletype/articleview/articleid/121/determing-sql-server-table-size.aspx

Wednesday 1 October 2008

Collation Setting Change In SQL 2005.

The collation of the server is taken as the default collation for all the system databases and the user databases that are created thereafter. Hence by changing the Collation setting for the Server we can create a default collation which would automatically be applied to the new user databases that are created.

Follow the below steps to change the collation for SQL Server 2005:

Take the backup of all the databases, jobs, logins etc.
1. Detach all the user databases.
2. To rebuild the master databse:
* Copy the SQL Bits
* From the command prompt you need to run the setup file. For this you have to change the directory in the command window to the directory where the SQL setup.exe file is located
egs:
C:\> cd d:\SQLBITS\SQL\Enterprise\X86\Tools


* Here you need to run the following command mentioning the new collation that you want to apply:

start /wait setup.exe /qb INSTANCENAME=MSSQLSERVER REINSTALL=SQL_Engine REBUILDDATABASE=1 SQLCOLLATION=
Note: Here the command assumes that we are using CD for sql server setup or Install.
Running the above command would lead you to the GUI Screen, similar to the one seen during SQL Installation. Following the instructions on this GUI screen would complete the rebuilding of master database
You may then re-attach the user databases.
Once this is done, you can check the server collation under properties window for a server in Management studio.

Here is the link for reference:
http://msdn.microsoft.com/en-us/library/ms144259.aspx

If we are using dumps for installation :
So open command prompt and browse to the location where sqlserver install dumps are located say D:\X86\Servers\ Now run the below command.

\setup.exe /qn INSTANCENAME=MSSQLSERVER REINSTALL=SQL_Engine REBUILDDATABASE=1 SAPWD= SQLCOLLATION=

1. SAPWD can be ignored if the sql server authentication is Windows only.
2. Incase if there are user databases and sql server agent jobs configured already then take backup of user database (attach/detach the .mdb and .ldf files) and sysjobs (script the jobs), User logins.

3. Backup the original resource database and system databases, Once the new databases are created with new collation then you can attach back the user databases and script the jobs.

Is there a way to determine node name in SQL using QA?

Customer Question:
I am running a 2-node SQL 2000 cluster in Active / Passive mode. Is there a way in SQL to determine what the node name would be, that runs the instance of SQL at any point in time?

Method :1
For SQL Server 2005 clustered instances, we can use a new serverproperty
select serverproperty('ComputerNamePhysicalNetBios')

->This will return the NetBIOS name of the local computer on which the instance of SQL Server is currently running
->Also, now in SQL 2005, the errorlogs tells us the actual node name too.

Method :2
DECLARE @NodeName sysname
EXEC master.dbo.xp_regread @rootkey='HKEY_LOCAL_MACHINE',
@key='SYSTEM\CurrentControlSet\Control\ComputerName\ComputerName\',
@value_name='ComputerName', @value=@NodeName OUTPUT
PRINT @NodeName

Wednesday 3 September 2008

Manually Uninstall SQL Server Instances

Scenario:
Active/Active Cluster:
3 Instances: Default and Named Instance 1 are sql 2000 and Named Instance 2 is on SQL 2005
Requirement:
Need to Un Install SQL 2k [Default and Named Instance 1]
Final Look:
You should have only named instance 2 [SQL 2k5]
Problems:

1) It looks like sql server 2000 and sql server 2005 have a common binn files on both the nodes i.e. on D:\mssql\

Backup Taken:

1) Copied Binn folder to the new location
2) All user database backups on SQL 2k5 named instance and also configure the T-log backups for all the database for point in time recovery.
3) MSDB database backup on SQL 2k5 named instance
4) Login Script [optional - take the script of Jobs/Linked Servers]
5) Dropped the SQL Server 2000 cluster resources from the cluadmin as this would stop the alerts [but still the sql server2000 instances remains]

Used the following KB article to uninstall SQL server instance manually

http://support.microsoft.com/kb/290991

We have referenced below kb article to remove the SQL Server from the server:

Plan 1:
1. It looks like sql server 2000 and sql server 2005 have a common binnfiles on both the nodes ie. on D:\mssql\
2. Incase if we follow the below article would there be any issuesfor exitsing 2005 instace ?
http://support.microsoft.com/kb/290991
Other work around would be to drop the SQL Server 2000 cluster resources from the cluadmin this would stop the alerts but still the sql server2000 instances remains.

Plan 2:
We can take a total backup of d:\mssql folder on both thedrives and take down time on all the 3 instances rename the existsing mssql-oldfold


Plan 2 worked for me :), before proceeding with this please be ensure that you have taken the full backup of your databases.

SSIS packages is going in suspended mode in SQL

Error In Log: 2008-08-22 00:30:00 - ! [LOG] Step 1 of job 'WWE_Live_EventsImporter' (0x02221292890280428E3B425FD9657674) cannot be run because the SSIS subsystem failed to load. The job has been suspended\

When you change servers and restore msdb/Attached old MSDB database, you may find your SSIS Packages/Maintenance plans failing and putting the following messages into various logs:
* The SSIS subsystem failed to load* Subsystem could not be loaded* The job has been suspended* The specified module could not be found
The problem is most likely that the location of your SQL Server installation directory differs from the entries in msdb table syssubsystems. As SQL Server keeps a table of pointers to the SSIS DLLs in msdb, we need to flush this table and repopulate it with the new locations (KB article 914171)

SELECT * FROM msdb.dbo.syssubsystems
Result:
SubSystem_DLL Path : D:\MSSQL.1\MSSQL\binn\SQLDTSSS90.DLL
Check the Actual path for this DLL file, if it is differ then below is the method to fix this:

-- Delete the existing rows.DELETE FROM msdb.dbo.syssubsystems
-- Fill the table with new rows pointing to the proper location of the DLLs.
EXEC msdb.dbo.sp_verify_subsystems 1
Restarted SQL Server Agent for it to pick up the new table entries and unsuspend the SSIS jobs.KB Article for Reference:
http://support.microsoft.com/kb/914171

Databases File Size [Trend Analysis] : SQL 2005 Script

Here is the script that is useful for to capture Databases File Sizes required for Trend Analysis:
/****
CREATE DATABASE TREND
USE TREND

IF OBJECT_ID('DatabaseFiles') IS NULL
BEGIN
SELECT TOP 0 file_id, name, physical_name, size*1.0/128 as [size in mbs], max_size, max_size*1.0/128 as [max_size in mbs],
growth, growth*1.0/128 as [growth in mbs], is_percent_growth INTO DatabaseFiles
FROM sys.database_files
ALTER TABLE DatabaseFiles
ADD CreationDate DATETIME DEFAULT(GETDATE())
END


EXECUTE sp_msforeachdb 'INSERT INTO DatabaseFiles SELECT file_id, name, physical_name, size*1.0/128 as [size in mbs], max_size, max_size*1.0/128 as [max_size in mbs],
growth, growth*1.0/128 as [growth in mbs], is_percent_growth, GETDATE() from [?].sys.database_files'


SELECT * FROM DATABASEFILES

*****/

You can create a scheduled job and include execute script to run once in a week and once you collected 3-6 months data, then you can export the necessary fields to Excel and using pivot table wizard you can do trend analysis.

Knowledge Base Article- SQL Server Assertion Errors

Error Description: SQL Server Assertion: File: , line=1070 Failed Assertion = 'db_mem'. This error may be timing-related. If the error persists after rerunning the statement, use DBCC CHECKDB to check the database for structural integrity, or restart the server to ensure in-memory data structures are not corrupted.

These assertion errors are related to Replication, The fix for this issue was first released in Cumulative Update 9.

Most of the SQL Assertion Errors are now fixed in Cumulative Update 9, whenever you find assertion Errors in the sql server first check if the server is configured for replication and then check the version of sql server hot fix level .

Following KB Article has the fix for Assertion errors. Not always the cu9 has the fix for the assertion we need to analyze / compare the assertions with fixes in cu9 most of the assertions related to replication are now fixed in sql server 2008 (katmai )

References :
http://support.microsoft.com/kb/956376/
http://support.microsoft.com/kb/953752/LN/
CAUSE
This problems occurs because of an interruption that occurs when the Merge Agent or the Log Reader Agent tries to allocate memory in the sqlservr!repl_add_mem function.
SYMPTOMS
Consider the following scenario. In Microsoft SQL Server 2005, you configure a transactional publication. When you synchronize data, you find that the following error message is logged in Replication Monitor:

Date Time SPID Error: 14151, Severity: 18, State: 1.
Date Time SPID Replication-Replication Transaction-Log Reader Subsystem: agent AgentName failed.
The process could not execute 'sp_repldone/sp_replcounters' on PublisherName .

If you configure a merge publication, you find that the following error message is logged in Replication
Monitor when you synchronize data:

The merge process could not perform retention-based meta data cleanup in database DatabaseName . (Source: Merge Replication Provider, Error number: -2147199467) Get help: http://help/-2147199467 General network error. Check your network documentation.
Additionally, the following error message is logged in the SQL Server 2005 Errorlog file:
Date Time SPID * BEGIN STACK DUMP:
Date Time SPID * Date Time SPID
Date Time SPID *
Date Time SPID * Location: repltimer.cpp:1070
Date Time SPID * Expression: db_mem
Date Time SPID * SPID: SPID
Date Time SPID * Process ID: ProcessID
Date Time SPID * Error: 17066, Severity: 16, State: 1.
Date Time SPID * SQL Server Assertion: File: , line=1070 Failed Assertion = 'db_mem'. This error may be timing-related. If the error persists after rerunning the statement, use DBCC CHECKDB to check the database for structural integrity, or restart the server to ensure in-memory data structures are not corrupted.

Date Time SPID Error: 3624, Severity: 20, State: 1.
Date Time SPID A system assertion check has failed. Check the SQL Server error log for details. Typically, an assertion failure is caused by a software bug or data corruption. To check for database corruption, consider running DBCC CHECKDB. If you agreed to send dumps to Microsoft during setup, a mini dump will be sent to Microsoft. An update might be available from Microsoft in the latest Service Pack or in a QFE from Technical Support.

How to determine the version of Microsoft SQL Server 2005 Integration Services (SSIS) that is installed on a computer.

You can determine the SSIS version by using one of the following methods.
Notes

SSIS does not support multiple instances. You can only install one instance of SSIS on a computer.

Method 1 is the easiest method to determine the version of SSIS.

If you cannot connect to the SSIS server, use Method 2, Method 3, or Method 4.
Method 1: Use Object Explorer
1.
Open SQL Server Management Studio.
2.
In the Connect to Server dialog box, click Integration Services in the Server type list.
3.
In the Server name box, specify the SSIS server name, and then click Connect.
4.
In Object Explorer, view the version number in the name of the root node.
The name of the root node appears in the following syntax:
Server_Name (Integration Services Version_No – Domain_Name\User_Name)
Notes

Server_Name represents the SSIS server name. Usually, the SSIS server name is the network name of the computer that is running SSIS.

Version_No respents the SSIS service pack level or the SSIS hotfix level.

User_Name represents the user name that you use to connect to SSIS.

Domain_Name represents the name of the domain that the user belongs to. If the user does not belong to a domain, Domain_Name represents the name of the computer that is running SSIS.
For example, assume the SSIS server name is MyServerName. The domain name is MyDomain. The user name is MyUser. The following table lists the service pack level, the version number, and the corresponding name of the root node:
Service pack level Version number Name of the root node
----------------------------------------------------------------------------------
The release version of SSIS 9.0.1399 MyServerName (Integration Services
9.0.1399 - MyDomain\MyUser)
SSIS with Service Pack 1 (SP1) 9.0.2047 MyServerName (Integration Services
9.0.2047 - MyDomain\MyUser)
SSIS with Service Pack 2 (SP2) 9.0.3042 MyServerName (Integration Services
9.0.3042 - MyDomain\MyUser)

Method 2: Use the MsDtsSrvr.exe file
Note The MsDtsSrvr.exe file is the SSIS service executable file.
1.
Open the following folder:
%programfiles%\Microsoft SQL Server\90\DTS\Binn\
2.
Right-click the MsDtsSrvr.exe file, and then click Properties.
3.
In the MsDtsSrvr.exe Properties dialog box, click the Version tab.
4.
On the Version tab, view the text after the File version label. The text is the SSIS version number.
The version number represents the SSIS service pack level or the SSIS hotfix level.The following table lists the SSIS service pack level and the corresponding version number:
Service pack level Text after the "File version" label
-------------------------------------------------------------------------------
The release version of SSIS 9.0.1399.0
SSIS with SP1 9.0.2047.0
SSIS with SP2 9.0.3042.0

If the server is running a 64-bit version of SSIS, the MsDtsSrvr.exe file is a 64-bit file. No 32-bit version of the MsDtsSrvr.exe file exists on the server. However, other SSIS executable files and SSIS DLLs have a corresponding 32-bit version file and a 64-bit version file. For example, on a server that is running a 64-bit version of SSIS, the DTExec.exe file has a 32-bit version file and a 64-bit version file.
Method 3: Use the registry
1.
Click Start, click Run, type Regedit, and then click OK.
2.
In Registry Editor, locate the following registry subkey:
HKEY_LOCAL_MACHINE\SOFTWARE\Microsoft\Microsoft SQL Server\90\DTS\Setup
Note If you are running a 32-bit version of SSIS on a 64-bit version of the Microsoft Windows operating system, locate the following registry subkey:
HKEY_LOCAL_MACHINE\SOFTWARE\Wow6432Node\Microsoft\Microsoft SQL Server\90\DTS\Setup
3.
In the Data column, view the value of the Version registry entry and the value of the Patchlevel registry entry.The value of the Version registry entry represents the SSIS service pack level. The value of the Patchlevel registry entry represents the SSIS hotfix level.
The following table lists the SSIS service pack level and the corresponding value of the Version registry entry.
Service pack level Value of the Version registry entry
-------------------------------------------------------------------------
The release version of SSIS 9.00.1399.06
SSIS with SP1 9.1.2047.00
SSIS with SP2 9.2.3042.00

Method 4: Use the Application log
1.
Click Start, click Run, type Eventvwr, and then click OK.
2.
In the Event Viewer window, click Application.
3.
Locate the event that meets the following requirements:

The value in the Event column is 257.

The value in the Source column is SQLISService.

The event is the most recent event of a series of similar events. To determine the most recent event, view the value in the Data column and the value in the Time column.
4.
Double-click the event that you located in step 3.
5.
In the Event Properties dialog box, view the Server version Version_Num text under Description.Version_Num represents the SSIS service pack level or the SSIS hotfix level.
The following table lists the SSIS service pack level and the corresponding Version_Num value.

Service pack level Version_Num in the "Server version Version_Num"
----------------------------------------------------------------------------------
The release version of SSIS 9.00.1399.00
SSIS with SP1 9.00.2047.00
SSIS with SP2 9.00.3042.00
Friday 1 February 2008

Good Tutorials on MS Technologies

Here you can find hundreds of pages of tutorials and dozens of hours of video to help you learn ASP.NET 2.0 and Visual Web Developer. This content is tailored to a variety of learning styles and technical levels.

http://www.asp.net/learn

Really very good :) I generally using this.

Good Tools For Troubleshooting !!!!

Below are some nice goodies you would like to try and put them to some use in few of your trouble-shooting activities. OR Just know them.

Tool : IIS Diagnostics Toolkit
Description : The IIS Diagnostics Toolkit is a compiled set of tools aimed at reducing the overall time to resolve problems with Internet Information Services (IIS) products.
Download Location / More Details :
http://www.microsoft.com/downloads/details.aspx?familyid=9BFA49BC-376B-4A54-95AA-73C9156706E7&displaylang=en

Tool : WMI Code Creator v1.0
Description : The WMI Code Creator tool allows you to generate VBScript, C#, and VB .NET code that uses WMI to complete a management task such as querying for management data, executing a method from a WMI class, or receiving event notifications using WMI.
Download Location / More Details :
http://www.microsoft.com/downloads/details.aspx?familyid=2CC30A64-EA15-4661-8DA4-55BBC145C30E&displaylang=en

Tool : Log Parser 2.2
Description : Log parser is a powerful, versatile tool that provides universal query access to text-based data such as log files, XML files and CSV files, as well as key data sources on the Windows® operating system such as the Event Log, the Registry, the file system, and Active Directory
Download Location / More Details :
http://www.microsoft.com/downloads/details.aspx?FamilyID=890cd06b-abf8-4c25-91b2-f8d975cf8c07&displaylang=en

Tool : Microsoft Network Monitor 3.1
Description : Network Protocol AnalyzerTool to allow capturing and protocol analysis of network traffic.
Download Location / More Details :
http://www.microsoft.com/downloads/details.aspx?familyid=18B1D59D-F4D8-4213-8D17-2F6DDE7D7AAC&displaylang=en