I got a chance to install SQL 2005 in Cluster environment over Mounted Drives. It was a good experience and great learning for me. I am sharing the important things here which we have to keep in mind before starting this activity.
Here is little bit difference in Installation on Normal Drives and Mounted Drives. Because these are LPA servers, you cannot add the accounts to the NT admin group - if they get added we need to get CSS help to remove them so this is a very important thing.
Because of that the permissions need to be set manually on the mounted drives. As they are mount points it can only be done through Disk Manager, not in the file explore and install to the mount points - not a normal install.
So instead of fixed drives like C, D and E, you have to install bits on Mounted Drives.
At any rate, if you do the permissions steps correctly then installation will go pretty smooth.
Prerequisites for Cluster installation of SQL 2005 over Mounted Drives:
Prerequisite 1: Copy the SQL bits on fixed drive.
Prerequisite 2: Add the Service Account in Security Policy on all the nodes.
Below are the lists of entry of Security Policies where we need to add the Service Account before installation:
1. Act as part of the Operating System
2. Adjust Memory quotas for a process
3. Allow log on through terminal Services
4. Backup files and directories
5. Bypass traverse checking
6. Debug programs
7. Increase scheduling priority
8. Lock pages in memory
9. Log on as a batch job
10. Log on as service
11. Manage auditing and security log
12. Replace a process level token
13. Restore files and directories
Prerequisite 3: Grant permission to the Service Account manually on mounted drives through Disk Manager. Don’t use file explore.
Prerequisite 4: Stop MOM, e-Trust and SNMP Services on all nodes.Prerequisite 5: Change NON SIGINGING DRIVE value to 0 on all nodes. (Registry value)Prerequisite 6: Change the environment variable value to C:\TEMP (My Computer -> Properties -> Advance -> Environment Variable) on all nodes.
Prerequisite 7: TS into Active Node using your account. (Check No one logged on passive nodes)
Installation Steps:
Step 1: Run Step.exe from SQL Bits. From here installation will go as per normal installation. Always use mounted drives for DATA file path.
Step 2: Choose the components whatever you want to install like Normal installation.
Step 3: Use the SQL and Agent service account.Step 4: Provide the Domain Group name under which service account exists.
Step 5: Read the information which comes on every dialog box and act accordingly till Finish Button.
Hope these steps will help you a lot whenever you will get a chance to install SQL 2005 over mounted drives.

I am related to Software Industry working as SQL Database Administrator, so I have created this blog to collect useful information about my area of work. It may contains references to stuff published somewhere else on internet [with full regards to the publisher, of course] and also some of my own. I will also post some out of the box stuff too, if I find it interesting.
Saturday, 24 January 2009


Sunday, 4 January 2009
Delete Entry from Services.msc using command or registry key
Create or Delete A Service in Windows:
Services are added from the Command Prompt. You need to know the actual service name as opposed to what Microsoft calls the Display Name. For example, if you wanted to create or delete the Help and Support service, the name used at the Command Prompt would be "helpsvc" rather than the Display Name of "Help and Support". The actual service name can be obtained by typing services.msc in Run on the Start Menu and then double clicking the Display Name of the service. Once you know the name;
To Create A Service
Start Run and type cmd in the Open: line. Click OK.
Type: sc create Service_Name
Reboot the system
To Delete A Service
Start Run and type cmd in the Open: line. Click OK.
Type: sc delete Service_Name
Reboot the system
If you prefer to work in the registry rather than through the command prompt to delete services:
Click Start Run and type regedit in the Open: line. Click OK.
Navigate to HKEY_LOCAL_MACHINE\SYSTEM\CurrentControlSet\Services
Scroll down the left pane, locate the service name, right click it and select Delete.
Reboot the system
Note: Take the registry backup before removing anything from registry.
Ref URL: http://www.theeldergeek.com/add_a_service_in_windows_xp.htm
Services are added from the Command Prompt. You need to know the actual service name as opposed to what Microsoft calls the Display Name. For example, if you wanted to create or delete the Help and Support service, the name used at the Command Prompt would be "helpsvc" rather than the Display Name of "Help and Support". The actual service name can be obtained by typing services.msc in Run on the Start Menu and then double clicking the Display Name of the service. Once you know the name;
To Create A Service
Start Run and type cmd in the Open: line. Click OK.
Type: sc create Service_Name
Reboot the system
To Delete A Service
Start Run and type cmd in the Open: line. Click OK.
Type: sc delete Service_Name
Reboot the system
If you prefer to work in the registry rather than through the command prompt to delete services:
Click Start Run and type regedit in the Open: line. Click OK.
Navigate to HKEY_LOCAL_MACHINE\SYSTEM\CurrentControlSet\Services
Scroll down the left pane, locate the service name, right click it and select Delete.
Reboot the system
Note: Take the registry backup before removing anything from registry.
Ref URL: http://www.theeldergeek.com/add_a_service_in_windows_xp.htm
Saturday, 27 December 2008
Manually Uninstalling SLS
Normally in cluster, we need to manually uninstall the SQL LiteSpeed.
Here the steps for uninstalling the SLS manually:
Delete the following XPs from within master
xp_file_search
xp_sqllitespeed_version
xp_sqllitespeed_licenseinfo
Use the following query for removing the XPs:
if exists (select * from dbo.sysobjects where id =object_id(N'[dbo].[xp_sqllitespeed_licenseinfo]') and OBJECTPROPERTY(id,N'IsExtendedProc') = 1)exec sp_dropextendedproc N'[dbo].[xp_sqllitespeed_licenseinfo]'
if exists (select * from dbo.sysobjects where id =object_id(N'[dbo].[xp_sqllitespeed_version]') and OBJECTPROPERTY(id,N'IsExtendedProc') = 1)exec sp_dropextendedproc N'[dbo].[xp_sqllitespeed_version]'
if exists (select * from dbo.sysobjects where id =object_id(N'[dbo].[ xp_file_search]') and OBJECTPROPERTY(id,N'IsExtendedProc') = 1)exec sp_dropextendedproc N'[dbo].[xp_file_search]'
Remove the following registry entries:
HKLM\SOFTWARE\Imceda
HKCU\Software\Imceda
HKCR\CLSID\{FAB7BBA2…}
Delete the following DLLs from SQL Binn folder:
xpSLS.dll
xpSLSImportStats.dll
xpLogShipping.dll
Delete all parent/child Imceda directories.
Binary files are removed from the directories ($\Imceda\LiteSpeed\SQL Server\Engine\Logs). Any of those parent\child directories should be deleted from all nodes in the cluster.
Tips during the installation of SLS on SQL Cluster:
When installing, installation should be performed from the Active node in the cluster to a drive that is unshared, but common to all nodes. E.g., D: drive (physical not virtual). Also be sure that “Remote Registry” service (svchost.exe) is running to help propagate bits to the passive node\nodes. SLS is cluster aware and should get installed on both nodes.
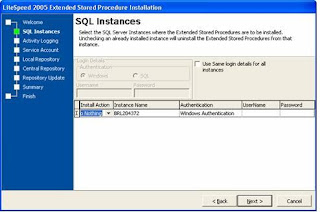
During phase 2 of installation (Instance Configuration: XP Installation), please be sure to choose ‘Do Nothing’ under Install Action for each instance that is active, and is not on the node(Virtual server) currently undergoing installation. Please find the screen shot below:
Here the steps for uninstalling the SLS manually:
Delete the following XPs from within master
xp_file_search
xp_sqllitespeed_version
xp_sqllitespeed_licenseinfo
Use the following query for removing the XPs:
if exists (select * from dbo.sysobjects where id =object_id(N'[dbo].[xp_sqllitespeed_licenseinfo]') and OBJECTPROPERTY(id,N'IsExtendedProc') = 1)exec sp_dropextendedproc N'[dbo].[xp_sqllitespeed_licenseinfo]'
if exists (select * from dbo.sysobjects where id =object_id(N'[dbo].[xp_sqllitespeed_version]') and OBJECTPROPERTY(id,N'IsExtendedProc') = 1)exec sp_dropextendedproc N'[dbo].[xp_sqllitespeed_version]'
if exists (select * from dbo.sysobjects where id =object_id(N'[dbo].[ xp_file_search]') and OBJECTPROPERTY(id,N'IsExtendedProc') = 1)exec sp_dropextendedproc N'[dbo].[xp_file_search]'
Remove the following registry entries:
HKLM\SOFTWARE\Imceda
HKCU\Software\Imceda
HKCR\CLSID\{FAB7BBA2…}
Delete the following DLLs from SQL Binn folder:
xpSLS.dll
xpSLSImportStats.dll
xpLogShipping.dll
Delete all parent/child Imceda directories.
Binary files are removed from the directories ($\Imceda\LiteSpeed\SQL Server\Engine\Logs). Any of those parent\child directories should be deleted from all nodes in the cluster.
Tips during the installation of SLS on SQL Cluster:
When installing, installation should be performed from the Active node in the cluster to a drive that is unshared, but common to all nodes. E.g., D: drive (physical not virtual). Also be sure that “Remote Registry” service (svchost.exe) is running to help propagate bits to the passive node\nodes. SLS is cluster aware and should get installed on both nodes.
During phase 2 of installation (Instance Configuration: XP Installation), please be sure to choose ‘Do Nothing’ under Install Action for each instance that is active, and is not on the node(Virtual server) currently undergoing installation. Please find the screen shot below:

Here are the Xps associated with corresponding DLLs in SQL LiteSpeed:
Ø xpSLS.dll
xp_backup_database
xp_backup_log
xp_delete_tsmfile
xp_file_search
xp_memory_size
xp_objectrecovery
xp_objectrecovery_viewcontents
xp_rebind_tsmmc
xp_restore_checkpassword
xp_restore_database
xp_restore_filelistonly
xp_restore_headeronly
xp_restore_log
xp_restore_setinfo
xp_restore_verifyonly
xp_sls_bcp
xp_slsAddRegMultiString
xp_slsReadProgress
xp_slsRemoveRegMultiString
xp_sqllitespeed_debug
xp_sqllitespeed_licenseinfo
xp_sqllitespeed_version
xp_view_tsmcontents
xp_view_tsmfilespaces
xp_view_tsmmc
Ø xpLogShipping.dll'
xp_slssqlmaint'
Ø xpSLSImportStats.dll
xp_litespeed_importstats
xp_litespeed_readlogs
Ø xpSLS.dll
xp_backup_database
xp_backup_log
xp_delete_tsmfile
xp_file_search
xp_memory_size
xp_objectrecovery
xp_objectrecovery_viewcontents
xp_rebind_tsmmc
xp_restore_checkpassword
xp_restore_database
xp_restore_filelistonly
xp_restore_headeronly
xp_restore_log
xp_restore_setinfo
xp_restore_verifyonly
xp_sls_bcp
xp_slsAddRegMultiString
xp_slsReadProgress
xp_slsRemoveRegMultiString
xp_sqllitespeed_debug
xp_sqllitespeed_licenseinfo
xp_sqllitespeed_version
xp_view_tsmcontents
xp_view_tsmfilespaces
xp_view_tsmmc
Ø xpLogShipping.dll'
xp_slssqlmaint'
Ø xpSLSImportStats.dll
xp_litespeed_importstats
xp_litespeed_readlogs
MSDB database has been corrupted in SQL2000
We now proceed further with following steps:
1. Restart the SQL server using trace flag 3608 then detach msdb databse. (-T3608)2. Navigating to the directory 'C:\Program Files\Microsoft SQL Server\MSSQL.1\MSSQL\Binn' and doing the following: start sqlservr.exe -c -T3608
3. Move or rename the damaged msdb files (msdbdata.mdf and msdblog.ldf in the 'C:\Program Files\Microsoft SQL Server\MSSQL.1\MSSQL\Data' directory)
4. Run the instmsdb.sql script in the 'C:\Program Files\Microsoft SQL Server\MSSQL.1\MSSQL\Install' directory
Shutdown and restart the server without the 3608 trace flag
1. Restart the SQL server using trace flag 3608 then detach msdb databse. (-T3608)2. Navigating to the directory 'C:\Program Files\Microsoft SQL Server\MSSQL.1\MSSQL\Binn' and doing the following: start sqlservr.exe -c -T3608
3. Move or rename the damaged msdb files (msdbdata.mdf and msdblog.ldf in the 'C:\Program Files\Microsoft SQL Server\MSSQL.1\MSSQL\Data' directory)
4. Run the instmsdb.sql script in the 'C:\Program Files\Microsoft SQL Server\MSSQL.1\MSSQL\Install' directory
Shutdown and restart the server without the 3608 trace flag
How to Change collation Change in SQL server 2005 (For Stand Alone/Cluster Server)
How to Change collation Change in SQL server 2005 (For Stand Alone Server)
http://msdn.microsoft.com/en-us/library/ms144259.aspx
start /wait\setup.exe /qn INSTANCENAME=MSSQLSERVER REINSTALL=SQL_Engine REBUILDDATABASE=1 SAPWD= SQLCOLLATION=
Note: SAPWD is not required if SQL is having Windows Authentication.
Point to be considered before collation change for cluster servers. SQL Server 2005 (Cluster Environment)
1. Virtual server name needs to be offline
2. http://support.microsoft.com/kb/q298568/
3. SQL server Browser Services needs to be in stopped state.
Run the below query from the command prompt
start /wait setup.exe /qn VS=cubsnew REINSTALL=SQL_Engine REBUILDDATABASE=1 GROUP=SQL Group NODELIST="tk5siebelpp0a,tk5siebelpp0b" SKUUPGRADE=1 SQLCOLLATION=Latin1_General_CI_AI
VS= SQL Server Virtual NameGROUP= SQL Group
NODELIST=”All Node Name”SKUUPGRADE=1SQLCOLLATION=New Collation Name
For SQL 2008:
Setup /QUIET /ACTION=REBUILDDATABASE /INSTANCENAME= MSSQLSERVER /SQLSYSADMINACCOUNTS= BUILTIN\Administrators /[ SAPWD= StrongPassword ] [ /SQLCOLLATION=CollationName]
http://msdn.microsoft.com/en-us/library/dd207003.aspx
http://msdn.microsoft.com/en-us/library/ms144259.aspx
start /wait
Note: SAPWD is not required if SQL is having Windows Authentication.
Point to be considered before collation change for cluster servers. SQL Server 2005 (Cluster Environment)
1. Virtual server name needs to be offline
2. http://support.microsoft.com/kb/q298568/
3. SQL server Browser Services needs to be in stopped state.
Run the below query from the command prompt
start /wait setup.exe /qn VS=cubsnew REINSTALL=SQL_Engine REBUILDDATABASE=1 GROUP=SQL Group NODELIST="tk5siebelpp0a,tk5siebelpp0b" SKUUPGRADE=1 SQLCOLLATION=Latin1_General_CI_AI
VS= SQL Server Virtual NameGROUP= SQL Group
NODELIST=”All Node Name”SKUUPGRADE=1SQLCOLLATION=New Collation Name
For SQL 2008:
Setup /QUIET /ACTION=REBUILDDATABASE /INSTANCENAME= MSSQLSERVER /SQLSYSADMINACCOUNTS= BUILTIN\Administrators /[ SAPWD= StrongPassword ] [ /SQLCOLLATION=CollationName]
http://msdn.microsoft.com/en-us/library/dd207003.aspx
MSDTC/ Client component issue after SP2 installation SQL2005
Error Displayed in Summary.txt after installation:
MSP Error: 29549 Failed to install and configure assemblies D:\MSSQL_Tools (x86)\90\NotificationServices\9.0.242\Bin\microsoft.sqlserver.notificationservices.dll
MSDTC Event ID: 4384
http://forums.microsoft.com/TechNet/ShowPost.aspx?PostID=2036880&SiteID=17
Checked cluster admin, and sure enough it is not there. You need to register MSDTC as a cluster resource, and then restart setup.
This is known issue, where client tool upgrades will not work unless the Distributed Transaction Coordinator is registered in the MSCS cluster (even if the SQL Engine is not installed)
How to configure Microsoft Distributed Transaction Coordinator on a Windows Server 2003 cluster
http://support.microsoft.com/kb/301600/
How to enable network DTC access in Windows Server 2003
http://support.microsoft.com/kb/817064/
MSP Error: 29549 Failed to install and configure assemblies D:\MSSQL_Tools (x86)\90\NotificationServices\9.0.242\Bin\microsoft.sqlserver.notificationservices.dll
MSDTC Event ID: 4384
http://forums.microsoft.com/TechNet/ShowPost.aspx?PostID=2036880&SiteID=17
Checked cluster admin, and sure enough it is not there. You need to register MSDTC as a cluster resource, and then restart setup.
This is known issue, where client tool upgrades will not work unless the Distributed Transaction Coordinator is registered in the MSCS cluster (even if the SQL Engine is not installed)
How to configure Microsoft Distributed Transaction Coordinator on a Windows Server 2003 cluster
http://support.microsoft.com/kb/301600/
How to enable network DTC access in Windows Server 2003
http://support.microsoft.com/kb/817064/
Not able to Start SQL Service due to diff path of TempDB database.
Issue: SQL services are stopped. Not able to Start due to diff path of TempDB database.
Assessment/Actions taken:
1. When we try to start we are ending up with the below error messages:
udopen: Operating system error 3(The system cannot find the path specified.) during the creation/opening of physical device D:\MSSQL\data\msdbdata.mdf.
FCB::Open failed: Could not open device d:\Program Files\Microsoft SQL Server\MSSQL\data\model.mdf for virtual device number (VDN) 1.
udopen: Operating system error 3(The system cannot find the path specified.) during the creation/opening of physical device D:\MSSQL\data\msdbdata.mdf.
2. These error messages says that few.MDF and .LDF files are missing. When we check, we could see all these files are available on driver C: (Path C:\Program Files\Microsoft SQL Server\MSSQL).
3. So we have copied all these databases from Drive C$ to Drive D$ (to where the MSSQL server is pointing)
4. After this step, we have started the service and experienced an error with the Tempdb database, SQl server service is pointing this database to T:\MSSQL\DATA\tempdb.mdf. But we are unable to find the Drive T$ (There is no Drive T$ on the server).
Log Name: Application
Source: MSSQLSERVER
Date: 27-12-2008 21:27:35
Event ID: 17204
Task Category: Server
Level: Error
Keywords: Classic
User: N/A
Computer: Pawan-PC
Description:
FCB::Open failed: Could not open file C:\MSSQL\TempDB\DATA\tempdb.mdf for file number 1. OS error: 3(failed to retrieve text for this error. Reason: 15105).
This is where the actual problem started, TempDB path is incorrect and we are unable to find the drive. Please follow these steps to resolve this issue:
a. Start SQL Server from a DOS session with minimal config and trace flag to bypass system db recovery (other than master):
Point CMD to Binn Folder C:\MSSQL\MSSQL10.MSSQLSERVER\MSSQL\Binn
NET START MSSQLSERVER /f /T3608
(We are unable to start with the SqlServr -c –f)
If your SQL instance is not the default instance, replace MSSQLSERVER with MSSQL$ where is the instance name.
When the SQL Server is started, you'll see the following:
The SQL Server () service is starting.The SQL Server () service was started successfully.
Then bring up the SQL Server error log and look for the following:
4:20:18.92 Server Dedicated admin connection support was established for listening locally on port 2168.
C:\MSSQL\MSSQL10.MSSQLSERVER\MSSQL\Binn>NET START MSSQLSERVER /f /T3608
The SQL Server (MSSQLSERVER) service is starting.
The SQL Server (MSSQLSERVER) service was started successfully.
b. Connect locally from the DOS prompt using the dedicated admin connection (DAC):
i. For SQL server 2005 use the command:
sqlcmd OR SQLCMD –A (For more info check SQL BOL)
sqlcmd -S tcp:127.0.0.1,
ii. For SQL server 2000 use the command:
Isqlw
iii. If i and ii is not working then Used OSQL utility to connect SQL Server
OSQL –SMSSQL$InstanceName –E
If Default Instance
OSQL –E (For more info check SQL BOL)
c. This will bring you the Query analyzer in SQL Server 2000; in 2005/2008 the prompt will get changed to 1>, then run the alter commands to modify the location of tempdb:
C:\MSSQL\MSSQL10.MSSQLSERVER\MSSQL\Binn>OSQL -E
1> ALTER DATABASE TEMPDB
2> MODIFY FILE
3> (NAME=templog,
4> FILENAME='C:\MSSQL\MSSQL10.MSSQLSERVER\MSSQL\DATA\templog.ldf'
5> )
6> go
The file "templog" has been modified in the system catalog. The new path will
be used the next time the database is started.
1> ALTER DATABASE TEMPDB
2> MODIFY FILE
3> (NAME=tempdev,
4> FILENAME='C:\MSSQL\MSSQL10.MSSQLSERVER\MSSQL\DATA\tempdb.mdf'
5> )
6>
7> go
The file "tempdev" has been modified in the system catalog. The new path will
be used the next time the database is started.
1> exit
C:\MSSQL\MSSQL10.MSSQLSERVER\MSSQL\Binn>NET STOP MSSQLSERVER
The SQL Server (MSSQLSERVER) service is stopping.
The SQL Server (MSSQLSERVER) service was stopped successfully.
Change the paths etc as appropriate if your locations are different.
Assessment/Actions taken:
1. When we try to start we are ending up with the below error messages:
udopen: Operating system error 3(The system cannot find the path specified.) during the creation/opening of physical device D:\MSSQL\data\msdbdata.mdf.
FCB::Open failed: Could not open device d:\Program Files\Microsoft SQL Server\MSSQL\data\model.mdf for virtual device number (VDN) 1.
udopen: Operating system error 3(The system cannot find the path specified.) during the creation/opening of physical device D:\MSSQL\data\msdbdata.mdf.
2. These error messages says that few.MDF and .LDF files are missing. When we check, we could see all these files are available on driver C: (Path C:\Program Files\Microsoft SQL Server\MSSQL).
3. So we have copied all these databases from Drive C$ to Drive D$ (to where the MSSQL server is pointing)
4. After this step, we have started the service and experienced an error with the Tempdb database, SQl server service is pointing this database to T:\MSSQL\DATA\tempdb.mdf. But we are unable to find the Drive T$ (There is no Drive T$ on the server).
Log Name: Application
Source: MSSQLSERVER
Date: 27-12-2008 21:27:35
Event ID: 17204
Task Category: Server
Level: Error
Keywords: Classic
User: N/A
Computer: Pawan-PC
Description:
FCB::Open failed: Could not open file C:\MSSQL\TempDB\DATA\tempdb.mdf for file number 1. OS error: 3(failed to retrieve text for this error. Reason: 15105).
This is where the actual problem started, TempDB path is incorrect and we are unable to find the drive. Please follow these steps to resolve this issue:
a. Start SQL Server from a DOS session with minimal config and trace flag to bypass system db recovery (other than master):
Point CMD to Binn Folder C:\MSSQL\MSSQL10.MSSQLSERVER\MSSQL\Binn
NET START MSSQLSERVER /f /T3608
(We are unable to start with the SqlServr -c –f)
If your SQL instance is not the default instance, replace MSSQLSERVER with MSSQL$
When the SQL Server is started, you'll see the following:
The SQL Server (
Then bring up the SQL Server error log and look for the following:
4:20:18.92 Server Dedicated admin connection support was established for listening locally on port 2168.
C:\MSSQL\MSSQL10.MSSQLSERVER\MSSQL\Binn>NET START MSSQLSERVER /f /T3608
The SQL Server (MSSQLSERVER) service is starting.
The SQL Server (MSSQLSERVER) service was started successfully.
b. Connect locally from the DOS prompt using the dedicated admin connection (DAC):
i. For SQL server 2005 use the command:
sqlcmd OR SQLCMD –A (For more info check SQL BOL)
sqlcmd -S tcp:127.0.0.1,
ii. For SQL server 2000 use the command:
Isqlw
iii. If i and ii is not working then Used OSQL utility to connect SQL Server
OSQL –SMSSQL$InstanceName –E
If Default Instance
OSQL –E (For more info check SQL BOL)
c. This will bring you the Query analyzer in SQL Server 2000; in 2005/2008 the prompt will get changed to 1>, then run the alter commands to modify the location of tempdb:
C:\MSSQL\MSSQL10.MSSQLSERVER\MSSQL\Binn>OSQL -E
1> ALTER DATABASE TEMPDB
2> MODIFY FILE
3> (NAME=templog,
4> FILENAME='C:\MSSQL\MSSQL10.MSSQLSERVER\MSSQL\DATA\templog.ldf'
5> )
6> go
The file "templog" has been modified in the system catalog. The new path will
be used the next time the database is started.
1> ALTER DATABASE TEMPDB
2> MODIFY FILE
3> (NAME=tempdev,
4> FILENAME='C:\MSSQL\MSSQL10.MSSQLSERVER\MSSQL\DATA\tempdb.mdf'
5> )
6>
7> go
The file "tempdev" has been modified in the system catalog. The new path will
be used the next time the database is started.
1> exit
C:\MSSQL\MSSQL10.MSSQLSERVER\MSSQL\Binn>NET STOP MSSQLSERVER
The SQL Server (MSSQLSERVER) service is stopping.
The SQL Server (MSSQLSERVER) service was stopped successfully.
Change the paths etc as appropriate if your locations are different.
Subscribe to:
Posts (Atom)